This blog post is excerpts from some of my previous Newsletters. If you would like to receive these emails at the time of publishing please subscribe to my newsletter, become one of my VIP’s and be the first to know what’s coming from the studio, be the first to see sneak peeks, videos, news and updates. Please subscribe in the yellow banner at the top of this website. Thank you, Jen x

JEN vs OIL PAINTS
Back in the early 2000s my studio was a small 7x4ft shed in the garden. It got pretty nippy out there so I insulated the inside of the shed and bought a little plug in oil radiator to keep me toasty.
It was a little haven of creativity until one particular evening I shut the door, got the oil radiator going full blast and then decided to embark on an oil painting.
At the time, as a hangover from my frugal student days, I used standard White Spirit as my thinner and brush cleaner.
As the creativity took flight in my cozy little shed I neglected to consider the effect of all these lovely fumes in an enclosed space. Needless to say I was sick for a good few days after basically gassing myself! Ooops!
Long story short (despite the fact that there are some odorless thinners out there) I decided it would be best to work mostly in Acrylic paint from that point forth.
I have been very happy with the hassle free process and clean up of Acrylic paints, however, oil paints have a very different texture and a depth of colour that I admire. I’ve long had my eye on some Water Mixable Oil paints so I recently ordered some, along with some compatible oil and a quick dry medium.
I am pleased to report they are much less smelly, and I am feeling quite well!
When testing out new products I like to begin work with them in my sketchbooks before moving to canvas. Please read on as I talk about how I use oil paints in my sketchbooks, using two of my Oil Studies to illustrate my process…
OIL PAINTING IN SKETCHBOOKS

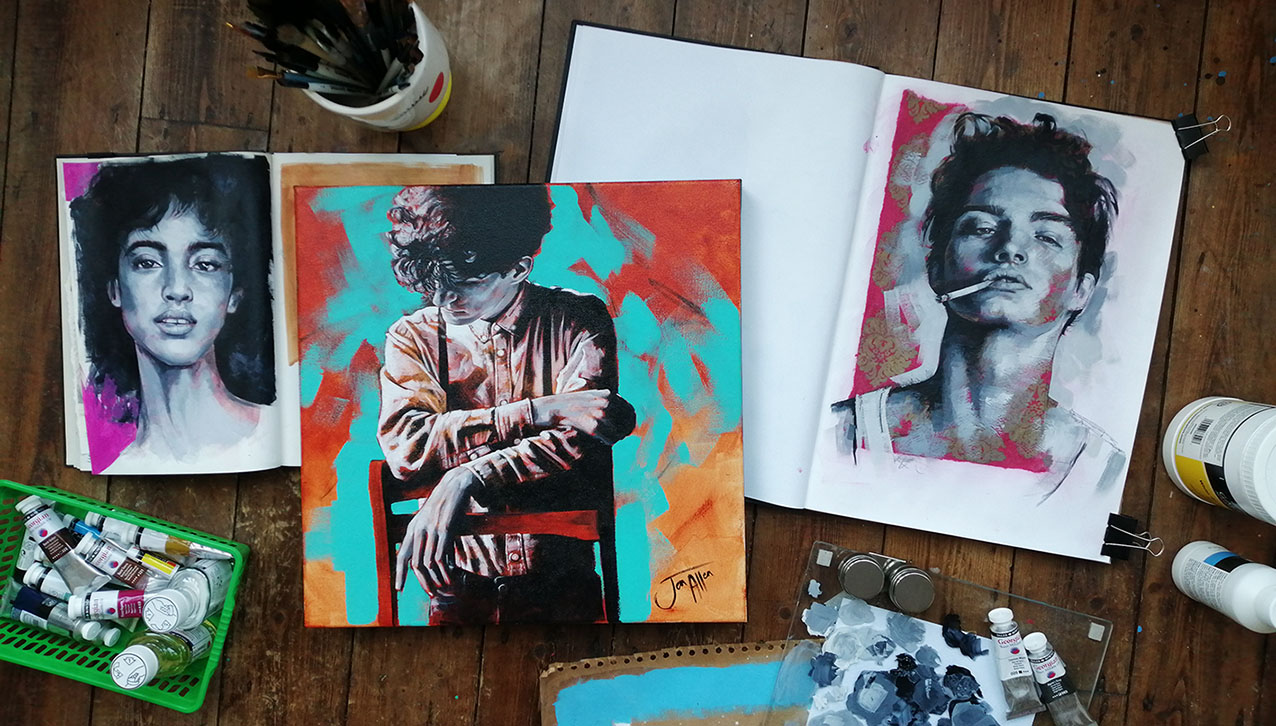
Sketchbook Study Process 1 – ‘The Blue Study’
Fig 1 (above). My Sketchbook is a simple cartridge paper sketchbook. To be able to paint effectively with oils on paper I first give the page a few layers of primer. In the above example I used a combination of white Gesso primer and blue acrylic paint.
Fig 2 (above). I found a reference photo I liked and sketched out the portrait in pencil first. In this instance I used a blue pencil as I like to see the lines and a little of the background coming through in the finished study.
My aim at this stage is to keep the drawing loose but establish the composition and proportions of the head. As this is only a sketchbook study my aim is not for perfect accuracy or detail. It’s just to capture what I like about the expression, mood and flow of the image.
Once I feel I have a pleasing composition I set the drawing with some fixative. You can get artist fixative for this. However, we have established my frugal (cheapskate!) nature in my previous email – namely, I don’t recommend using white spirit as a thinner as I almost gassed myself!
Good old fashioned hairspray is absolutely fine for personal sketchbooks and it’s cheap! Should you wish to fix things professionally or are archiving drawings, then yes, invest in proper fixative.
Fig 3 (above). Now it’s on to the oil paint layer. Here I am using water mixable oil paints with a quick dry medium as my thinner. I am working in just 2 colours: Payne’s Grey and Titanium White. My focus is mainly on the tones of the face as I already had the proportions of the head established. I work back and forth from the lightest areas to the darkest.
As a finishing touch I added a little more of the blue to complete the study.

Sketchbook Study Process Two – ‘The Red Study’
My process here is very similar to the previous study with a few different products involved in the initial stages, so I thought I would share this as an alternative approach to a similar subject matter.
Fig 1 (above). I first pasted down a torn scrap of handmade gold printed paper using an acrylic matt medium. Once that was dry I gave the page a few coats of a clear gesso primer.
The line drawing was done in graphite pencil and fixed with hairspray. Again, not ever so professional but at least my sketchbook smells nice eh?! ;D
Fig 2 (above). Using the same 2 colours as the Blue Study I worked on tone. I left some of that lovely handmade paper showing through in parts.